开篇词
该指南向你展示如何使用 Spring Boot 创建一个多模块项目。该项目将具有一个库 jar 和使用该库的主应用。你还可以使用它来查看如何自行构建库(既不是应用的 jar 文件)。
你将创建的应用
我们将设置一个库 jar,它公开简单的 “Hello, World” 消息服务,然后将该服务包含在使用库作为依赖项的 Web 应用中。
你将需要的工具
- 大概 15 分钟左右;
- 你最喜欢的文本编辑器或集成开发环境(IDE)
- JDK 1.8 或更高版本;
- Gradle 4+ 或 Maven 3.2+
- 你还可以将代码直接导入到 IDE 中:
- Spring Too Suite (STS)
- IntelliJ IDEA
如何完成这个指南
像大多数的 Spring 入门指南一样,你可以从头开始并完成每个步骤,也可以绕过你已经熟悉的基本设置步骤。如论哪种方式,你最终都有可以工作的代码。
- 要从头开始,移步至创建根项目;
- 要跳过基础,执行以下操作:
- 下载并解压缩该指南将用到的源代码,或借助 Git 来对其进行克隆操作:
git clone https://github.com/spring-guides/draft-gs-multi-module.git - 切换至
draft-gs-multi-module/initial目录; - 跳转至该指南的从 Spring Initializr 开始。
- 下载并解压缩该指南将用到的源代码,或借助 Git 来对其进行克隆操作:
待一切就绪后,可以检查一下 draft-gs-multi-module/complete 目录中的代码。
创建根项目
该指南逐步完成了两个项目的构建,其中一个是对另一个项目的依赖。因此,我们需要在根项目下创建两个子项目。但首先,在顶层创建构建配置。对于 Maven,我们将需要一个带 <modules> 的 pom.xml 列出子目录:
<?xml version="1.0" encoding="UTF-8"?>
<project xmlns="http://maven.apache.org/POM/4.0.0" xmlns:xsi="http://www.w3.org/2001/XMLSchema-instance"
    xsi:schemaLocation="http://maven.apache.org/POM/4.0.0 https://maven.apache.org/xsd/maven-4.0.0.xsd">
    <modelVersion>4.0.0</modelVersion>

    <groupId>org.springframework</groupId>
    <artifactId>gs-multi-module</artifactId>
    <version>0.1.0</version>
    <packaging>pom</packaging>

    <modules>
        <module>library</module>
        <module>application</module>
    </modules>

</project>
对于 Gradle,我们需要一个 settings.gradle,其中包含相同的目录:
rootProject.name = 'gs-multi-module'

include 'library'
include 'application'
并且(可选)我们可以包含一个空的 build.gradle(以帮助 IDE 识别根目录)。
创建目录结构
在要用作根目录的目录中,创建以下子目录结构(例如,使用 *nix 系统上的 mkdir library application):
└── library
└── application
在项目的根目录中,我们将需要建立一个构建系统,该指南将向我们展示如何使用 Maven 或 Gradle。
从 Spring Initializr 开始
对于所有的 Spring 应用来说,你应该从 Spring Initializr 开始。Initializr 提供了一种快速的方法来提取应用程序所需的依赖,并为你完成许多设置。对于该指南,我们需要运行两次 Spring Initializr,一次针对库,一次针对应用。
- 搭建库项目
- 搭建应用项目
创建库项目
这两个项目之一用作另一个项目(应用)将使用的库。
创建目录结构
在 library 目录中,创建以下子目录结构(例如,在 *nix 系统上使用 mkdir -p src/main/java/com/example/multimodule/service):
└── src
    └── main
        └── java
            └── com
                └── example
                    └── multimodule
                        └── service
现在,我们需要配置一个构建工具(Maven 或 Gradle)。在这两种情况下,请注意,库项目中根本没有使用 Spring Boot 插件。该插件的主要功能是创建一个可执行文件 “超级 jar”,我们既不需要而又不想要的库。
尽管未使用 Spring Boot Maven 插件,但我们确实希望利用 Spring Boot 依赖管理,因此可以通过使用 Spring Boot 的 spring-boot-starter-parent 作为父项目来进行配置。另一种选择是将依赖管理作为 pom.xml 文件的 <dependencyManagement/> 部分中的材料清单(BOM)导入。
搭建库项目
下图显示了此示例项目的 Initializr 设置:
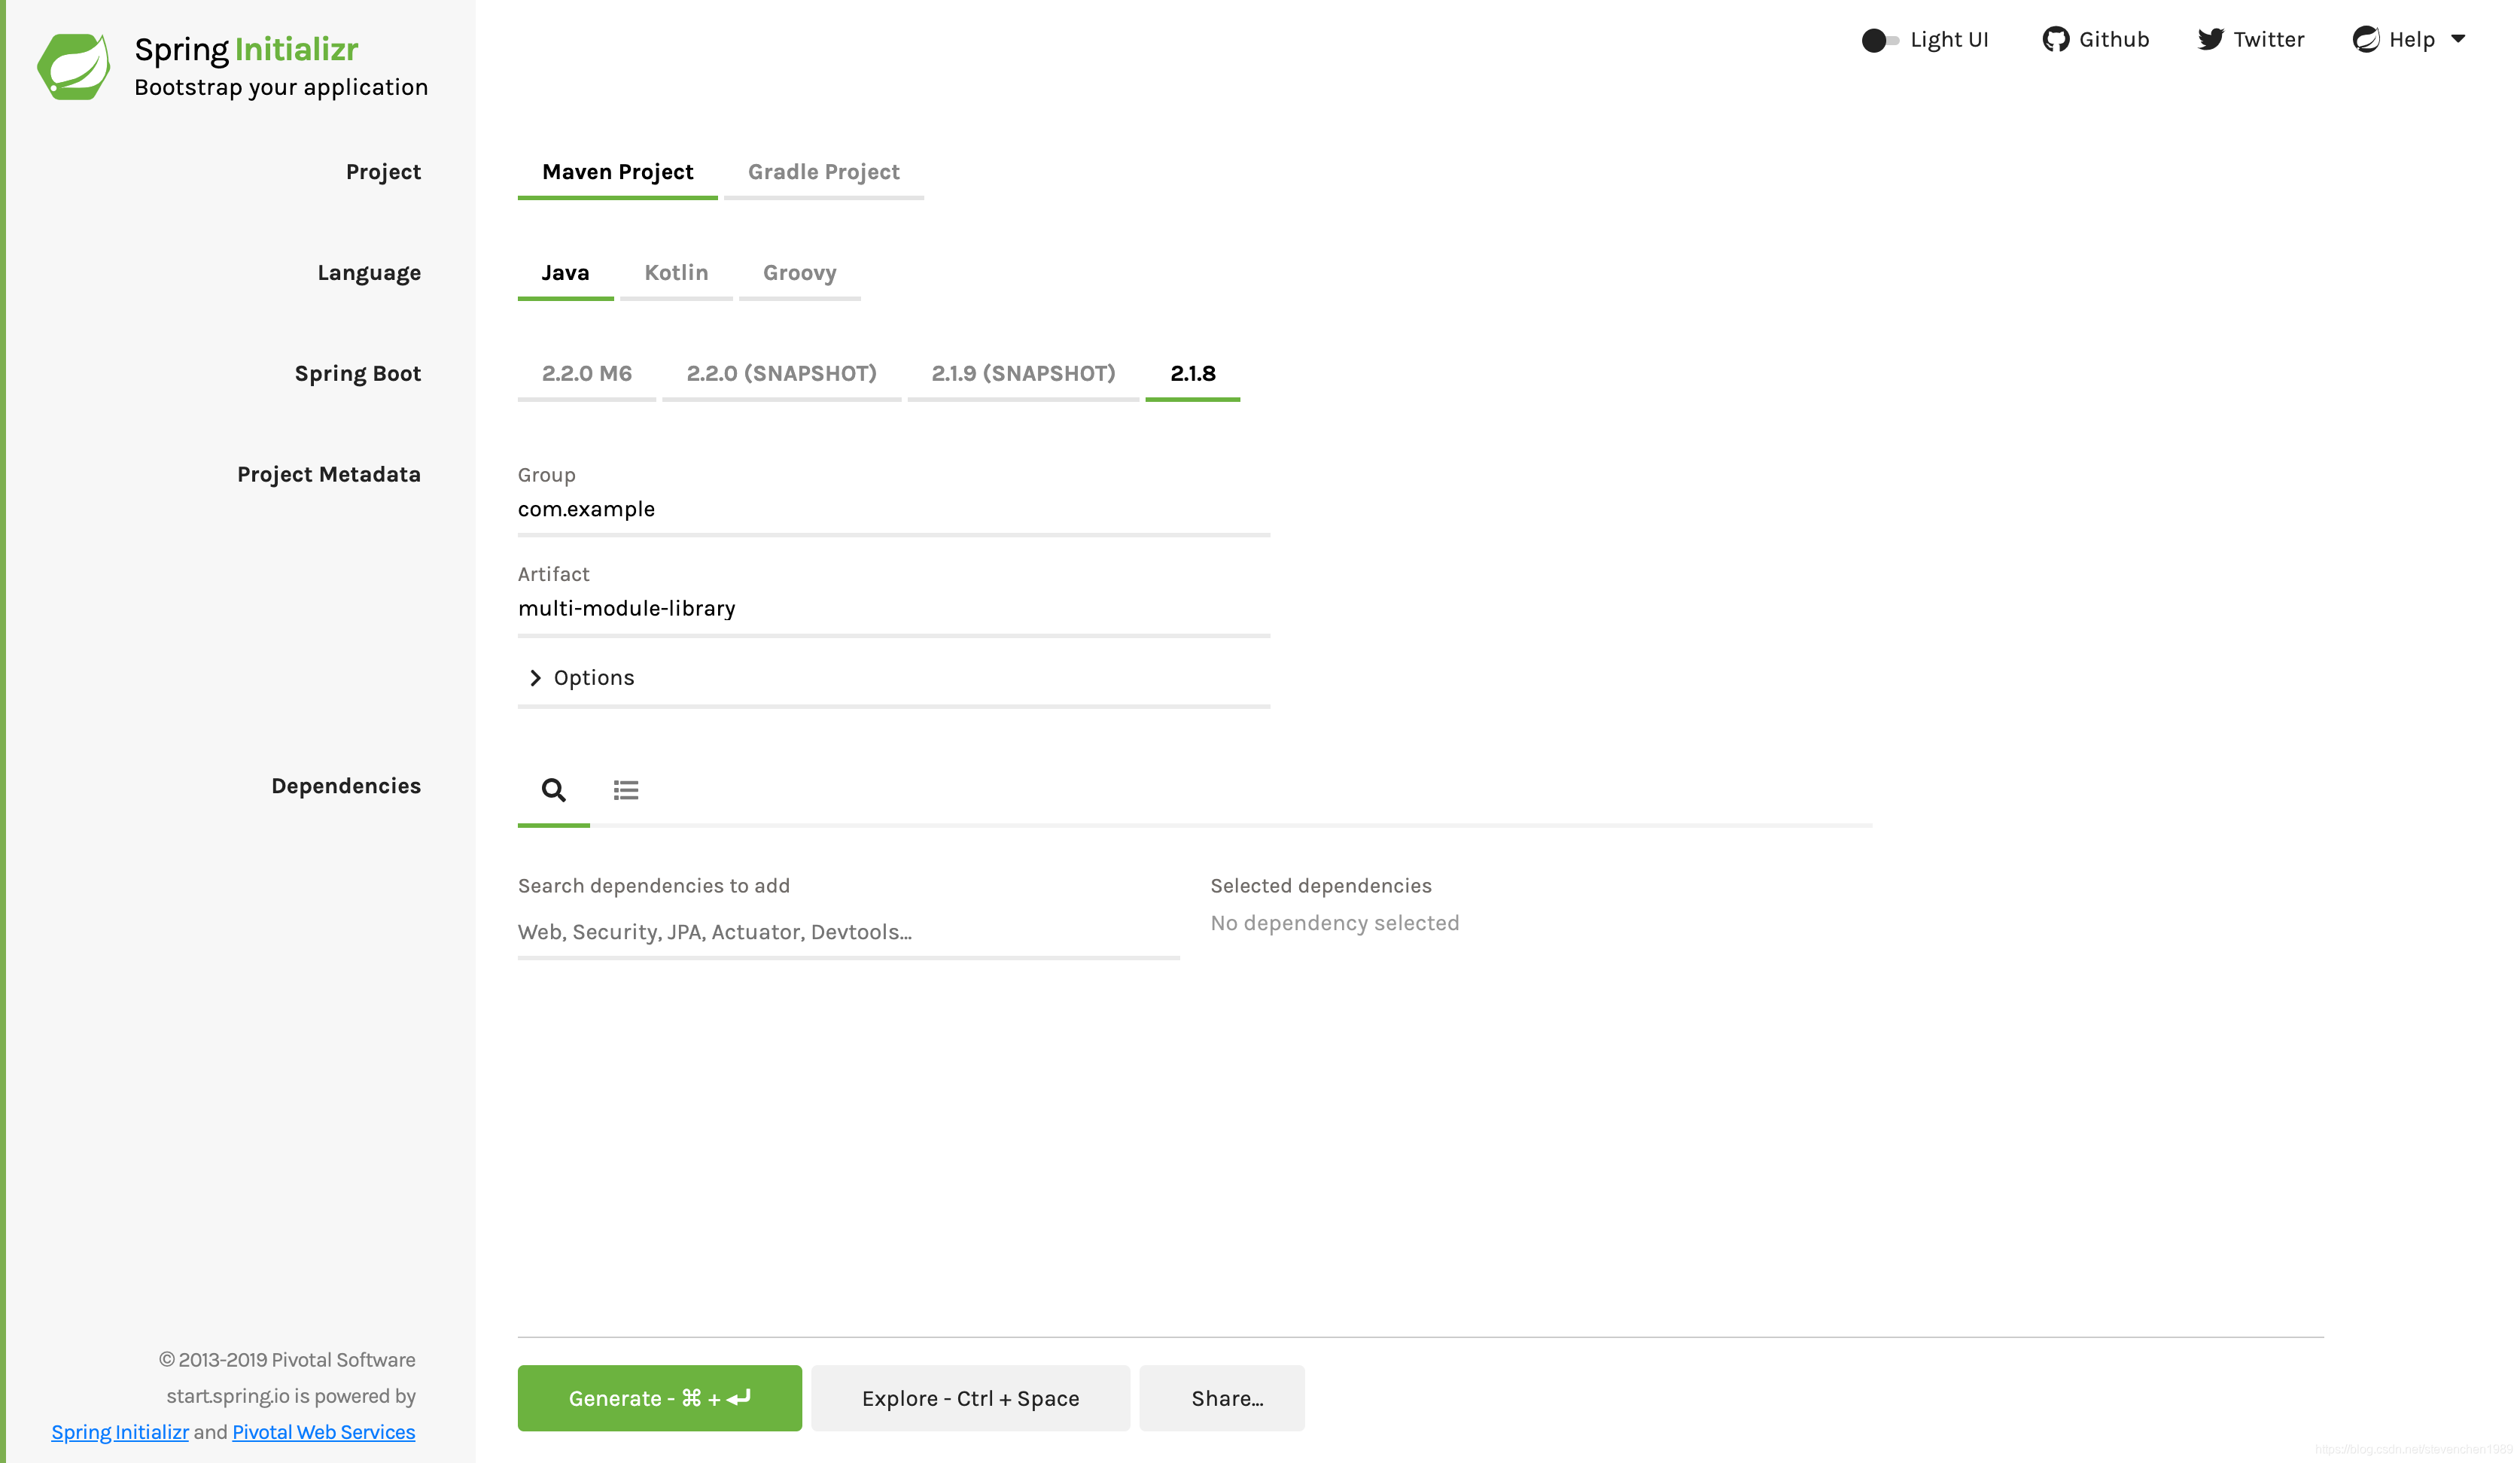
上图显示了选择 Maven 作为构建工具的 Initializr。你也可以使用 Gradle。它还将
com.example和multi-module-library的值分别显示为 Group 和 Artifact。在本示例的其余部分,将用到这些值。
以下清单显示了选择 Maven 时创建的 pom.xml 文件:
<?xml version="1.0" encoding="UTF-8"?>
<project xmlns="http://maven.apache.org/POM/4.0.0" xmlns:xsi="http://www.w3.org/2001/XMLSchema-instance"
	xsi:schemaLocation="http://maven.apache.org/POM/4.0.0 https://maven.apache.org/xsd/maven-4.0.0.xsd">
	<modelVersion>4.0.0</modelVersion>
	<parent>
		<groupId>org.springframework.boot</groupId>
		<artifactId>spring-boot-starter-parent</artifactId>
		<version>2.2.0.RELEASE</version>
		<relativePath/> <!-- lookup parent from repository -->
	</parent>
	<groupId>com.example</groupId>
	<artifactId>multi-module-library</artifactId>
	<version>0.0.1-SNAPSHOT</version>
	<name>multi-module-library</name>
	<description>Demo project for Spring Boot</description>

	<properties>
		<java.version>1.8</java.version>
	</properties>

	<dependencies>
		<dependency>
			<groupId>org.springframework.boot</groupId>
			<artifactId>spring-boot-starter</artifactId>
		</dependency>

		<dependency>
			<groupId>org.springframework.boot</groupId>
			<artifactId>spring-boot-starter-test</artifactId>
			<scope>test</scope>
			<exclusions>
				<exclusion>
					<groupId>org.junit.vintage</groupId>
					<artifactId>junit-vintage-engine</artifactId>
				</exclusion>
			</exclusions>
		</dependency>
	</dependencies>

	<build>
		<plugins>
			<plugin>
				<groupId>org.springframework.boot</groupId>
				<artifactId>spring-boot-maven-plugin</artifactId>
			</plugin>
		</plugins>
	</build>

</project>
以下清单显示了在选择 Gradle 时创建的 build.gradle 文件:
plugins {
	id 'org.springframework.boot' version '2.2.0.RELEASE'
	id 'io.spring.dependency-management' version '1.0.8.RELEASE'
	id 'java'
}

group = 'com.example'
version = '0.0.1-SNAPSHOT'
sourceCompatibility = '1.8'

repositories {
	mavenCentral()
}

dependencies {
	implementation 'org.springframework.boot:spring-boot-starter'
	testImplementation('org.springframework.boot:spring-boot-starter-test') {
		exclude group: 'org.junit.vintage', module: 'junit-vintage-engine'
	}
}

test {
	useJUnitPlatform()
}
调整库项目
如果我们是从 start.spring.io 生成的 Library 项目,则它将包含构建系统的包装器脚本(mvnw 或 gradlew 取决于我们所做的选择)。我们可以将该脚本及其关联的配置移至根目录。
$ mv mvnw* .mvn ..
$ mv gradlew* gradle ..
Library 项目没有使用 main 方法的类(因为它不是应用)。因此,我们必须告诉构建系统不要尝试为 Library 项目构建可执行 jar。(默认情况下,Spring Initializr 会生成可执行项目。)
要告诉 Maven 不为 Library 项目构建可执行 jar,必须从 Spring Initializr 创建的 pom.xml 中删除以下块:
<build>
  <plugins>
    <plugin>
      <groupId>org.springframework.boot</groupId>
      <artifactId>spring-boot-maven-plugin</artifactId>
    </plugin>
  </plugins>
</build>
以下清单显示了 Library 项目的最终 pom.xml 文件:
<?xml version="1.0" encoding="UTF-8"?>
<project xmlns="http://maven.apache.org/POM/4.0.0" xmlns:xsi="http://www.w3.org/2001/XMLSchema-instance"
	xsi:schemaLocation="http://maven.apache.org/POM/4.0.0 https://maven.apache.org/xsd/maven-4.0.0.xsd">
	<modelVersion>4.0.0</modelVersion>
	<parent>
		<groupId>org.springframework.boot</groupId>
		<artifactId>spring-boot-starter-parent</artifactId>
		<version>2.2.0.RELEASE</version>
		<relativePath/> <!-- lookup parent from repository -->
	</parent>
	<groupId>com.example</groupId>
	<artifactId>multi-module-library</artifactId>
	<version>0.0.1-SNAPSHOT</version>
	<name>multi-module-library</name>
	<description>Demo project for Spring Boot</description>

	<properties>
		<java.version>1.8</java.version>
	</properties>

	<dependencies>
		<dependency>
			<groupId>org.springframework.boot</groupId>
			<artifactId>spring-boot-starter</artifactId>
		</dependency>

		<dependency>
			<groupId>org.springframework.boot</groupId>
			<artifactId>spring-boot-starter-test</artifactId>
			<scope>test</scope>
		</dependency>
	</dependencies>

</project>
要告诉 Gradle 不为 Library 项目构建可执行的 jar,必须将以下块添加到 Spring Initializr 创建的 build.gradle 中:
bootJar {
  enabled = false
}

jar {
  enabled = true
}
bootJar 任务尝试创建一个可执行 jar,这需要 main() 方法。结果,我们需要禁用 bootJar 任务并启用 jar 任务(这将创建普通的 jar 而不是可执行的 jar)。
以下清单显示了 Library 项目的最终 build.gradle 文件:
plugins {
	id 'org.springframework.boot' version '2.2.0.RELEASE'
	id 'io.spring.dependency-management' version '1.0.8.RELEASE'
	id 'java'
}

group = 'com.example'
version = '0.0.1-SNAPSHOT'
sourceCompatibility = '1.8'

repositories {
	mavenCentral()
}

bootJar {
	enabled = false
}

jar {
	enabled = true
}

dependencies {
	implementation 'org.springframework.boot:spring-boot-starter'
	testImplementation('org.springframework.boot:spring-boot-starter-test') {
		exclude group: 'org.junit.vintage', module: 'junit-vintage-engine'
	}
}

test {
	useJUnitPlatform()
}
创建服务组件
该库将提供可由应用使用的 MyService 类。以下清单(来自 library/src/main/java/com/example/multimodule/service/MyService.java)显示了 MyService 类:
package com.example.multimodulelibrary;

import org.springframework.boot.context.properties.EnableConfigurationProperties;
import org.springframework.stereotype.Service;

@Service
@EnableConfigurationProperties(ServiceProperties.class)
public class MyService {

  private final ServiceProperties serviceProperties;

  public MyService(ServiceProperties serviceProperties) {
    this.serviceProperties = serviceProperties;
  }

  public String message() {
    return this.serviceProperties.getMessage();
  }
}
要使其在标准 Spring Boot 习惯用法中(与 application.properties 一起)可配置,我们还可以添加 @ConfigurationProperties 类。ServiceProperties 类(来自 library/src/main/java/com/example/multimodule/service/ServiceProperties.java)满足以下需求:
package com.example.multimodulelibrary;

import org.springframework.boot.context.properties.ConfigurationProperties;

@ConfigurationProperties("service")
public class ServiceProperties {

  /**
   * A message for the service.
   */
  private String message;

  public String getMessage() {
    return message;
  }

  public void setMessage(String message) {
    this.message = message;
  }
}
我们不必这样做。一个库可能只提供纯 Java API,而没有 Spring 功能。在这种情况下,使用该库的应用将需要自行提供配置。
测试服务组件
我们将要为我们的库组件编写单元测试。如果我们将可重用的 Spring 配置作为该库的一部分提供,则可能还需要编写集成测试,以确保该配置有效。为此,可以使用 JUnit 和 @SpringBootTest 注解。以下清单(来自 library/src/test/java/com/example/multimodule/service/MyServiceTest.java)显示了如何执行该操作:
package com.example.multimodulelibrary;

import static org.assertj.core.api.Assertions.assertThat;

import org.junit.jupiter.api.Test;

import org.springframework.beans.factory.annotation.Autowired;
import org.springframework.boot.autoconfigure.SpringBootApplication;
import org.springframework.boot.test.context.SpringBootTest;

@SpringBootTest("service.message=Hello")
public class MultiModuleLibraryApplicationTests {

	@Autowired
	private MyService myService;

	@Test
	public void contextLoads() {
		assertThat(myService.message()).isNotNull();
	}

	@SpringBootApplication
	static class TestConfiguration {
	}

}
在前面的清单中,我们已经使用
@SpringBootTest注解的默认属性为测试配置了service.message。我们不建议将application.properties放入库中,因为在运行时可能会与使用该库的应用发生冲突(从类路径中仅加载了一个application.properties)。我们可以将application.properties放在测试类路径中,但不能将其包含在 jar 中(例如,将其放在src/test/resources中)。
创建应用项目
应用项目使用库项目,库项目提供了其他项目可以使用的服务。
创建目录结构
在 application 目录中,创建以下子目录结构(例如,在 *nix 系统上使用 mkdir -p src/main/java/com/example/multimodule/application on *nix systems)
除非要通过应用中的 @ComponentScan 在库中包含所有 Spring 组件,否则请不要使用与库相同的包(或库包的父包)。
搭建应用项目
对于应用项目,我们需要 Spring Web 和 Spring Boot Actuator 依赖。下图显示了此示例项目的 Initializr 设置:
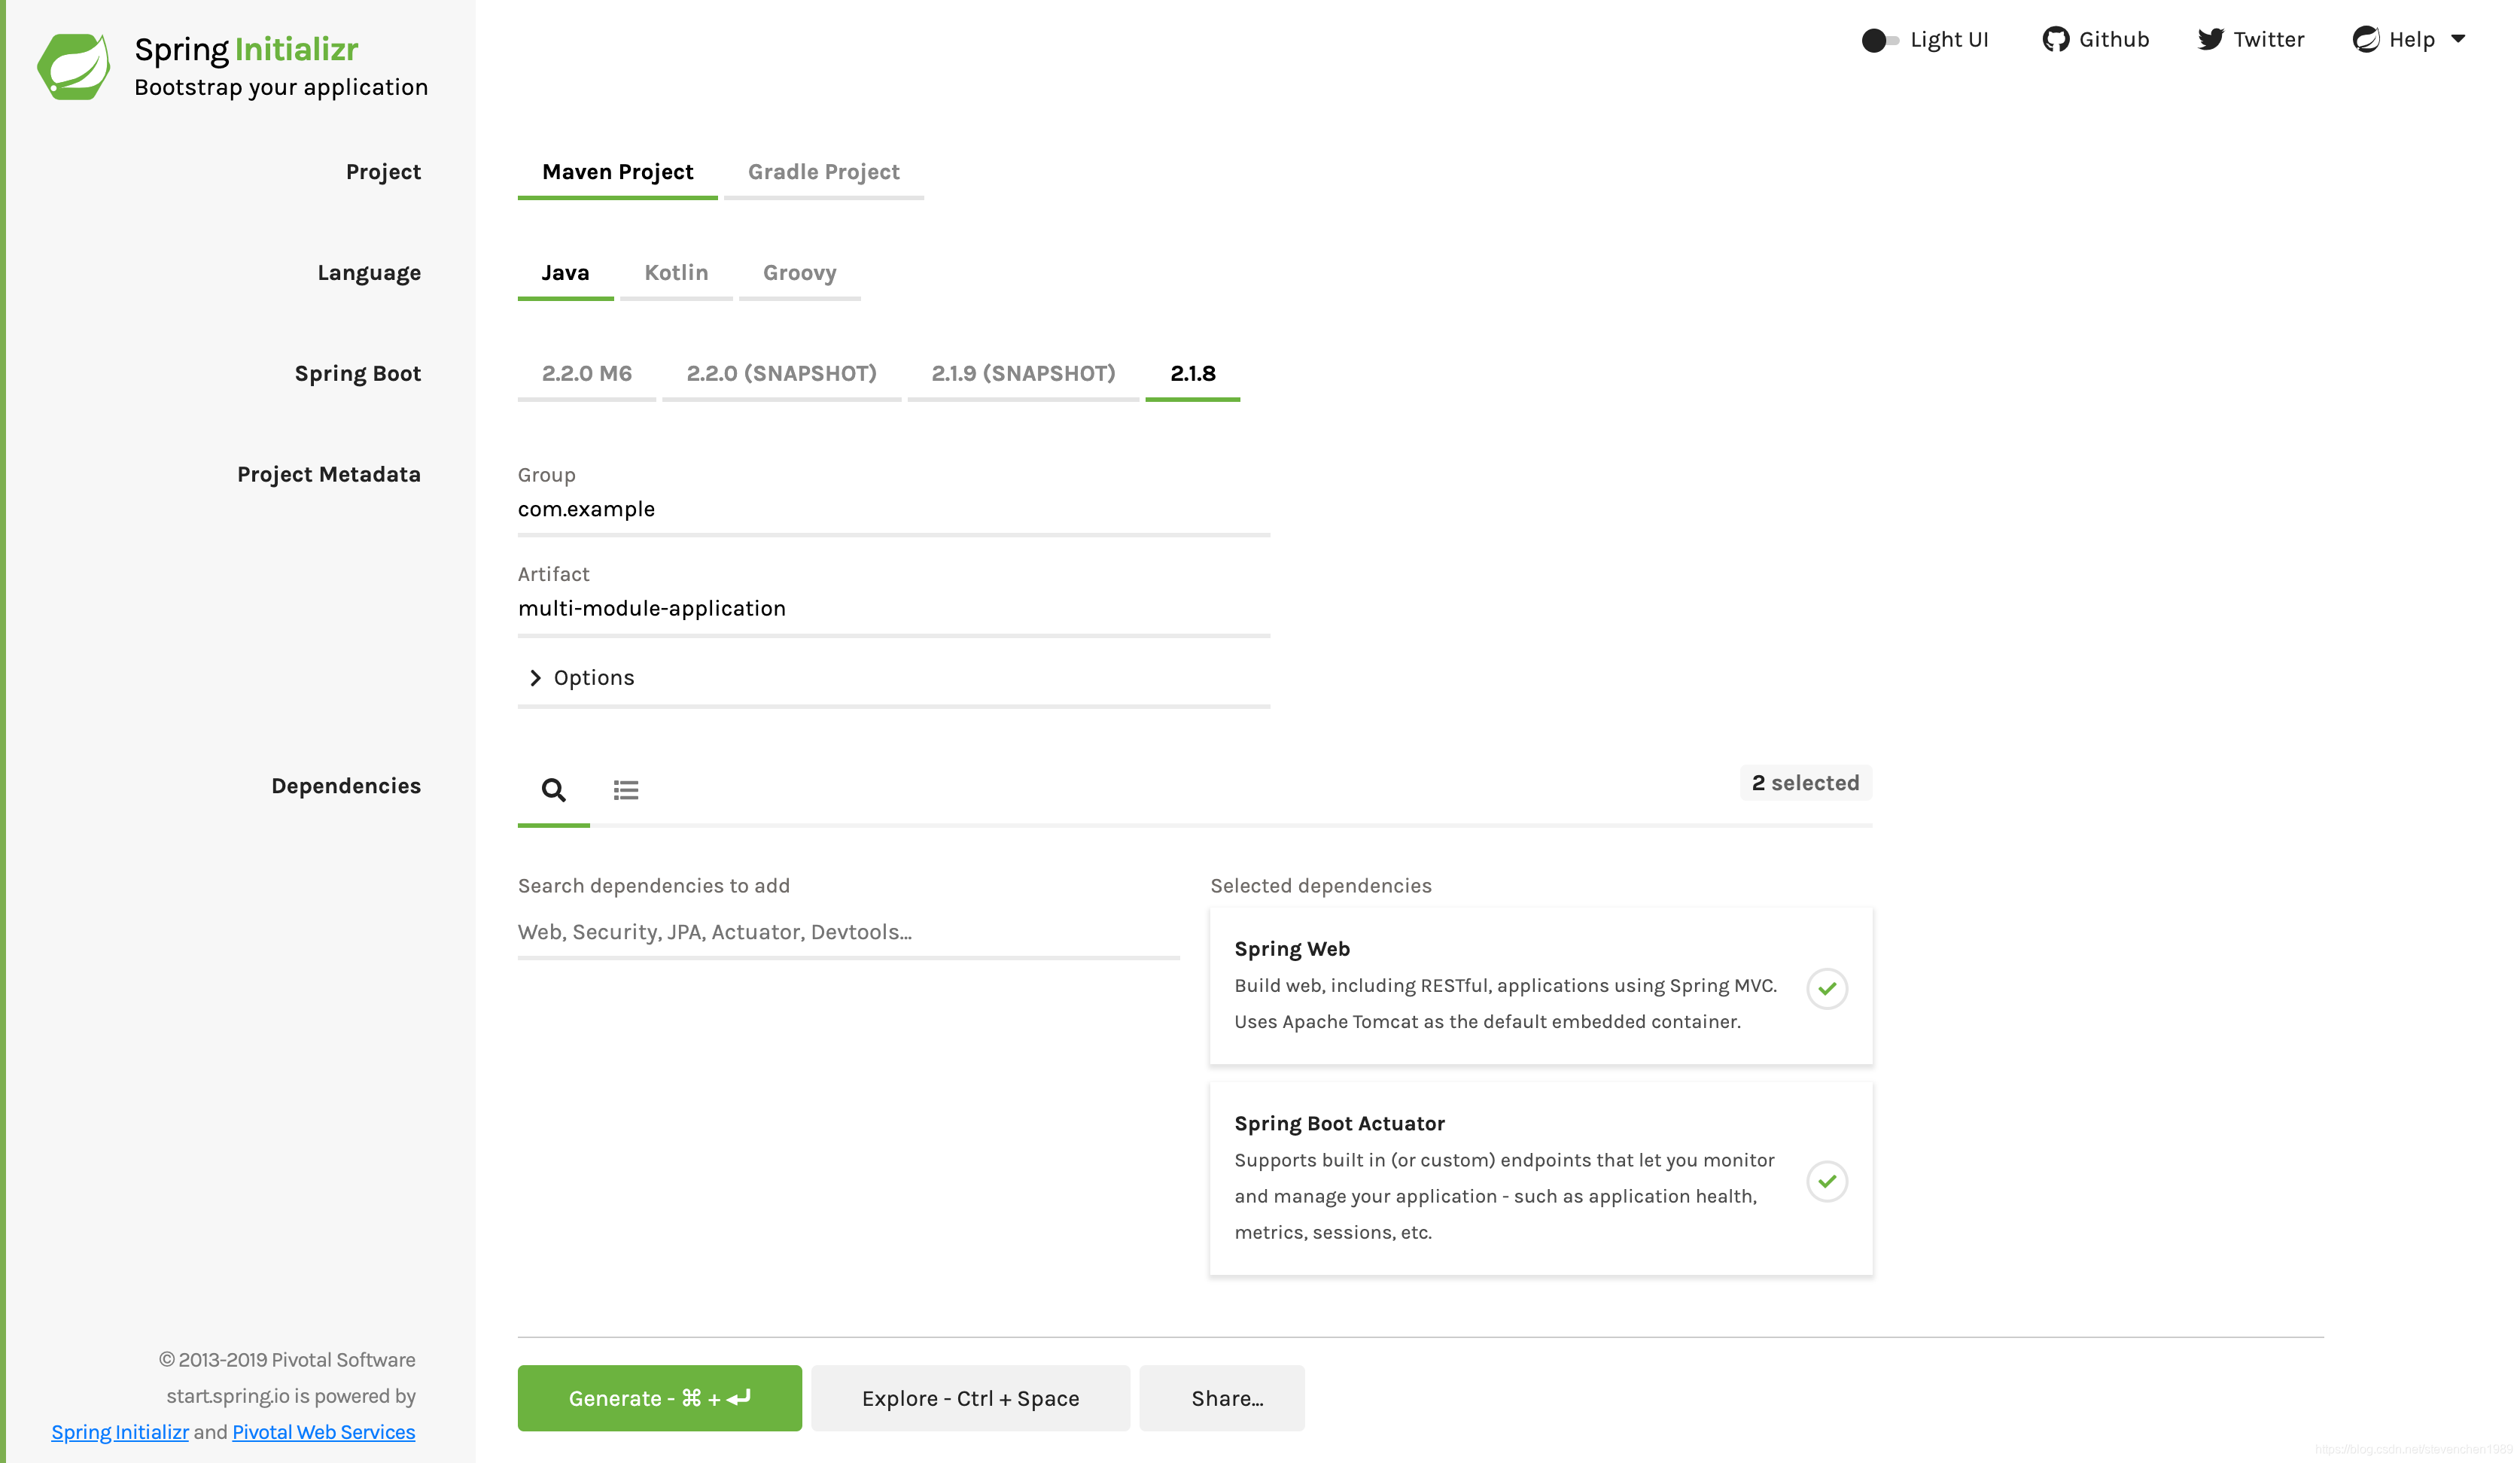
上图显示了选择 Maven 作为构建工具的 Initializr。你也可以使用 Gradle。它还将
com.example和multi-module-application的值分别显示为 Group 和 Artifact。在本示例的其余部分,将用到这些值。
以下清单显示了选择 Maven 时创建的 pom.xml 文件:
<?xml version="1.0" encoding="UTF-8"?>
<project xmlns="http://maven.apache.org/POM/4.0.0" xmlns:xsi="http://www.w3.org/2001/XMLSchema-instance"
	xsi:schemaLocation="http://maven.apache.org/POM/4.0.0 https://maven.apache.org/xsd/maven-4.0.0.xsd">
	<modelVersion>4.0.0</modelVersion>
	<parent>
		<groupId>org.springframework.boot</groupId>
		<artifactId>spring-boot-starter-parent</artifactId>
		<version>2.2.0.RELEASE</version>
		<relativePath/> <!-- lookup parent from repository -->
	</parent>
	<groupId>com.example</groupId>
	<artifactId>multi-module-application</artifactId>
	<version>0.0.1-SNAPSHOT</version>
	<name>multi-module-application</name>
	<description>Demo project for Spring Boot</description>

	<properties>
		<java.version>1.8</java.version>
	</properties>

	<dependencies>
		<dependency>
			<groupId>org.springframework.boot</groupId>
			<artifactId>spring-boot-starter-actuator</artifactId>
		</dependency>
		<dependency>
			<groupId>org.springframework.boot</groupId>
			<artifactId>spring-boot-starter-web</artifactId>
		</dependency>

		<dependency>
			<groupId>org.springframework.boot</groupId>
			<artifactId>spring-boot-starter-test</artifactId>
			<scope>test</scope>
			<exclusions>
				<exclusion>
					<groupId>org.junit.vintage</groupId>
					<artifactId>junit-vintage-engine</artifactId>
				</exclusion>
			</exclusions>
		</dependency>
	</dependencies>

	<build>
		<plugins>
			<plugin>
				<groupId>org.springframework.boot</groupId>
				<artifactId>spring-boot-maven-plugin</artifactId>
			</plugin>
		</plugins>
	</build>

</project>
以下清单显示了在选择 Gradle 时创建的 build.gradle 文件:
plugins {
	id 'org.springframework.boot' version '2.2.0.RELEASE'
	id 'io.spring.dependency-management' version '1.0.8.RELEASE'
	id 'java'
}

group = 'com.example'
version = '0.0.1-SNAPSHOT'
sourceCompatibility = '1.8'

repositories {
	mavenCentral()
}

dependencies {
	implementation 'org.springframework.boot:spring-boot-starter-actuator'
	implementation 'org.springframework.boot:spring-boot-starter-web'
	testImplementation('org.springframework.boot:spring-boot-starter-test') {
		exclude group: 'org.junit.vintage', module: 'junit-vintage-engine'
	}
}

test {
	useJUnitPlatform()
}
我们可以删除 mvnw 和/或 gradlew 包装器及其关联的配置文件:
$ rm -rf mvnw* .mvn
$ rm -rf gradlew* gradle
添加库依赖
应用项目需要依赖库项目。我们需要相应地修改我们的应用构建文件。
对于 Maven,添加以下依赖:
<dependency>
  <groupId>com.example</groupId>
  <artifactId>multi-module-library</artifactId>
  <version>${project.version}</version>
</dependency>
以下清单显示了完成的 pom.xml 文件:
<?xml version="1.0" encoding="UTF-8"?>
<project xmlns="http://maven.apache.org/POM/4.0.0" xmlns:xsi="http://www.w3.org/2001/XMLSchema-instance"
	xsi:schemaLocation="http://maven.apache.org/POM/4.0.0 https://maven.apache.org/xsd/maven-4.0.0.xsd">
	<modelVersion>4.0.0</modelVersion>
	<parent>
		<groupId>org.springframework.boot</groupId>
		<artifactId>spring-boot-starter-parent</artifactId>
		<version>2.2.0.RELEASE</version>
		<relativePath/> <!-- lookup parent from repository -->
	</parent>
	<groupId>com.example</groupId>
	<artifactId>multi-module-application</artifactId>
	<version>0.0.1-SNAPSHOT</version>
	<name>multi-module-application</name>
	<description>Demo project for Spring Boot</description>

	<properties>
		<java.version>1.8</java.version>
	</properties>

	<dependencies>
		<dependency>
			<groupId>org.springframework.boot</groupId>
			<artifactId>spring-boot-starter-actuator</artifactId>
		</dependency>
		<dependency>
			<groupId>org.springframework.boot</groupId>
			<artifactId>spring-boot-starter-web</artifactId>
		</dependency>
		<dependency>
			<groupId>com.example</groupId>
			<artifactId>multi-module-library</artifactId>
			<version>${project.version}</version>
		</dependency>

		<dependency>
			<groupId>org.springframework.boot</groupId>
			<artifactId>spring-boot-starter-test</artifactId>
			<scope>test</scope>
			<exclusions>
				<exclusion>
					<groupId>org.junit.vintage</groupId>
					<artifactId>junit-vintage-engine</artifactId>
				</exclusion>
			</exclusions>
		</dependency>
	</dependencies>

	<build>
		<plugins>
			<plugin>
				<groupId>org.springframework.boot</groupId>
				<artifactId>spring-boot-maven-plugin</artifactId>
			</plugin>
		</plugins>
	</build>

</project>
对于 Gradle,添加以下依赖:
implementation project(':library')
以下清单显示了完整的 build.gradle 文件:
plugins {
	id 'org.springframework.boot' version '2.2.0.RELEASE'
	id 'io.spring.dependency-management' version '1.0.8.RELEASE'
	id 'java'
}

group = 'com.example'
version = '0.0.1-SNAPSHOT'
sourceCompatibility = '1.8'

repositories {
	mavenCentral()
}

dependencies {
	implementation 'org.springframework.boot:spring-boot-starter-actuator'
	implementation 'org.springframework.boot:spring-boot-starter-web'
	implementation project(':library')
	testImplementation('org.springframework.boot:spring-boot-starter-test') {
		exclude group: 'org.junit.vintage', module: 'junit-vintage-engine'
	}
}

test {
	useJUnitPlatform()
}
编写应用
应用中的主类可以是 @RestController,它使用库中的 Service 来呈现消息。以下清单(来自 application/src/main/java/com/example/multimodule/application/DemoApplication.java)显示了该类:
package com.example.multimoduleapplication;

import com.example.multimodulelibrary.MyService;
import org.springframework.boot.SpringApplication;
import org.springframework.boot.autoconfigure.SpringBootApplication;
import org.springframework.web.bind.annotation.GetMapping;
import org.springframework.web.bind.annotation.RestController;

@SpringBootApplication(scanBasePackages = "com.example")
@RestController
public class MultiModuleApplication {

	private final MyService myService;

	public MultiModuleApplication(MyService myService) {
		this.myService = myService;
	}

	@GetMapping("/")
	public String home() {
		return myService.message();
	}

	public static void main(String[] args) {
		SpringApplication.run(MultiModuleApplication.class, args);
	}
}
@SpringBootApplication 是一个便利的注解,它添加了以下所有内容:
@Configuration:将类标注为应用上下文 Bean 定义的源;@EnableAutoConfiguration:告诉 Spring Boot 根据类路径配置、其他 bean 以及各种属性的配置来添加 bean。@ComponentScan:告知 Spring 在com/example包中寻找他组件、配置以及服务。
main() 方法使用 Spring Boot 的 SpringApplication.run() 方法启动应用。
由于 DemoApplication 与 MyService(com.example.multimodule.application)位于不同的包(com.example.multimodule.service)中,因此 @SpringBootApplication 无法自动检测到它。有多种方法可以使 MyService 生效:
- 使用
@Import(MyService.class)直接导入; - 通过使用
@SpringBootApplication(scanBasePackageClasses={...})从其包中获取所有内容; - 通过名称指定父包:
com.example.multimodule。(该指南只用该方法)
如果我们的应用还使用 JPA 或 Spring Data,则 @EntityScan 和 @EnableJpaRepositories (及相关)注解在未被显式指定时仅从 @SpringBootApplication 继承其基本包。也就是说,一旦指定了 scanBasePackageClasses 或 scanBasePackages,我们可能还必须显式使用 @EntityScan 和 @EnableJpaRepositoriese,并对其包扫描进行显式配置。
创建 application.properties 文件
我们需要在 application.properties 中的库中提供该服务的消息。在源文件夹中,我们需要创建一个名为 application/src/main/resources/application.properties。以下清单显示了一个可以工作的文件:
service.message=Hello, World
测试应用
通过启动应用来检测端到端结果。我们可以在 IDE 中启动应用,也可以使用命令行。应用运行后,请在浏览器中访问客户端应用,网址为 http://localhost:8080/。在那里,我们应该在响应中看到 Hello, World。
如果我们使用 Gradle,则以下命令(实际上是依次执行两个命令)将首先构建库,然后运行应用:
$ ./gradlew build && ./gradlew :application:bootRun
如果我们使用 Maven,则以下命令(实际上是依次执行两个命令)将首先构建库,然后运行应用:
$ ./mvnw install && ./mvnw spring-boot:run -pl application
概述
恭喜你!我们已经使用 Spring Boot 创建了可重用的库,然后使用该库来构建应用。
参见
以下指南也可能会有所帮助:
- 使用 Spring Boot 构建应用
- 集中化配置
想看指南的其他内容?请访问该指南的所属专栏:《Spring 官方指南》